3 Things You Need to Know to Produce High-Quality Exhibit Graphics

3 Things You Need to Know to Produce High-Quality Exhibit Graphics

Unlike other traditional marketing, trade show exhibits offer your audience an opportunity to get up-close and personal with your brand by exploring your booth from many different angles and vantage points. When creating graphics for these large-scale, three-dimensional structures, it’s easy to overlook minor details that turn out to be major when they appear on the show floor.

Below you’ll learn three facets to focus on to help you produce high-quality exhibit graphics for your next booth.

Think Big.

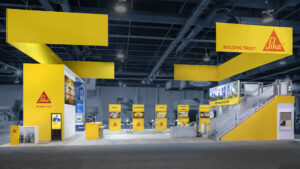
When planning the graphics for your exhibit design, you’ve got to think big. Consider the following when creating artwork for your booth.

  • How does the text or imagery in your design relate to the average height of a person (which is about 5’ 4” for women and 5’ 9” for men in the U.S. according to worldpopulationreview.com)?
  • Which graphics need to be read from a distance versus up-close inside the booth? Is your artwork and messaging too large or too small for someone to view comfortably at those distances?
  • Is your artwork placed too low or too high for your audience to read without having to arch their back or strain their neck?
  • Are there elements of the booth, such as counters or monitors, that may obstruct important information?
  • How will your graphics appear when split by another wall or if they are wrapped around a corner?

All these factors play a part in how your exhibit graphics will need to be planned. Any mistakes, typos, or image quality issues that are in your design file will be very noticeable when produced in large scale. There’s nothing worse than seeing an error staring back at you ten times the size it was when originally created on your computer screen. Not to mention the extra labor and material costs it takes to reproduce the graphic.

As you think about the above questions, you’ll also want to check your graphic files by zooming in at 100% and zooming out to full view so you can get an on-screen visual approximation for different viewing distances.

Pro tip: keep a tape measure handy to help you determine actual size of design elements for comparison to how a visitor will view it at full size in your booth.


Keep It Consistent.

Like a billboard on a busy highway, trade show booths need to quickly attract the attention of passersby on a busy show floor.

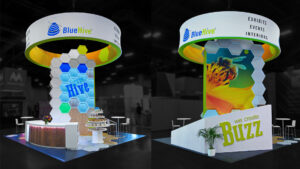
One way to do this with your graphics is to make them consistent with your other marketing communication pieces. Referencing your brand’s style guidelines can help. By using consistent colors, fonts, imagery, graphics, and text throughout, your brand will be recognized anywhere you go.

Think of it this way: if each chorus of your favorite song sounded totally different every time you heard it, you wouldn’t recognize it as the same song.

When your booth graphics don’t match up with the branding of your other marketing communications, how will your customers recognize that it belongs to the same company they’ve come to know? How will it have a chance to stand out on the show floor?

If you don’t have brand guidelines to reference, a simple rule to follow is less is more. Creating designs with less text and large, prominent imagery is sure to attract more attention than filling your booth design full of copy. Using clear, simple, and consistent messaging and imagery to tell your story can make a big impact on your audience moving out of the aisle and into your booth.

Your booth has only a few seconds to grab somebody’s attention. Keeping your graphics consistent and clear can help make that happen.


Know Your Materials.

Durable materials such as printed fabric, Sintra® and vinyl are commonly used substrates for applying graphics to your exhibit. Materials such as these play a big role in helping you produce high-quality graphics for your exhibit. Each texture has unique properties that affect how your graphics will appear on your booth.

For instance, with fabric, the seams are less visible plus it can be lit from behind or not at all. Lighting fabric adds depth and make the graphic seem like it’s glowing, but take note that the colors and imagery will change slightly in appearance. For best results you want to use as much color as possible. However, you’ll need to consider a balance of hues and saturation. What may appear as a nice, dark black when unlit can easily appear as a shade of gray when illuminated.

On the other hand, using hard substrates such as Sintra® and vinyl will result in visible seams in your graphics. In addition, these materials are front-lit, more reflective, and can use a wider variety of lighting color options, depending on what your booth requires, as well as what the show and venue regulations allow.

Getting familiar with the different types of material your graphics will be produced on, if you’re not already, will give you a better understanding of how each reacts under different lighting conditions and environments; in turn, allowing you to make more knowledgeable decisions when it comes to designing graphics for your trade show exhibit.

Of course, in-depth discussions with your exhibit company on the intended look of your booth graphics will help eliminate any surprises up front before you even start creating them. The more you can plan for ahead of time, the smoother the process and the stronger your exhibit graphics will be when displayed on the show floor.


Conclusion:

In the end, the process of designing high-quality graphics whether for small-scale marketing projects or large-scale exhibit booths isn’t all that different. The main differences are the scale, perception, and production details as outlined above. As with most anything worthwhile, it’s all about the details. Paying close attention to the sizing and formatting of your graphics, and how they might be perceived by your intended audience, will help make sure your trade show booth graphics are of the highest quality for your brand when showtime arrives. Working closely with your trade show exhibit vendor and their graphic production artist will also help get your booth artwork in top shape.

If you need any assistance designing or producing your next trade show exhibit booth, feel free to reach out. Our Hivers are always ready to help.

Virtual Events: Timeline and Marketing Considerations

Rome Was Not Built in a Day. Neither are Virtual Events.

If you’ve been following along chronologically in this blog series, you’ve read our introduction to virtual events, including an overview of objectives, audience, and technology considerations, and you’ve read through the details we’ve shared on the virtual event location, content types and considerations, communication tools and their not-so-traditional uses, as well as our insights into how to prove ROI.

Now, we want to take a moment in this last blog to talk about timelines. ​Because we get it; we’re all in the same boat. We’re all in uncharted waters, being asked to solve new problems and create new solutions—and we have to do it fast.​

But as the saying goes, “Rome wasn’t built in a day.” Even though virtual events do not have the same building requirements as physical ones, there’s still a timeline to consider. Sure, it won’t follow the typical six months needed for a physical exhibit, but, creating a virtual event is not like flipping a switch.​

We’re working with our vendors to create new services from their existing range of products on the fly. (Which is a good thing, by the way, because we’re all helping each other to pivot our offerings and our strategies in this ‘new normal.’) But we’re typically seeing and hearing an estimate of six to eight weeks for turnaround time from the moment content is received. And that’s a good thing, folks, because it gives you the time you need to market and promote your event and draw a crowd to your virtual space. ​

As illustrated below, what we’ve talked about so far in this blog series is what falls under the middle bucket here—your during-show efforts. From the development of your virtual space, to the content experiences and interactive activities, to the live chats and leave-behind downloadable content.​

Let’s quickly touch upon marketing the event. Because you’re putting on your own event, you need to make sure you have a strong pre-event marketing campaign in place. There’s no show organization to rely on, so it’s important to create as many touch points as makes sense to your audience…and your budget.​

Ah, the hot-word: Budget.

We realize virtual events have different costs than physical events. But, there is still a cost. Virtual events are developed with technology partners, web developers and app programmers, designers and writers, video producers and digital strategists…you get the point. So, there’s a lot of tech, and that comes at a price. Yes, it’s typically less than a physical event, but it tends to scale based on the same way as your physical event. ​

From a recent survey we conducted, a majority of companies pivoting to virtual events are planning to allocate somewhere between a quarter to a half of their budget to the virtual space. That’s a great start, and we suggest if you’re in a similar boat, that you take some of that cost savings from going virtual and reinvest and reallocate it to your marketing efforts. ​

Perhaps you want to mail your attendees some pre-event swag like a margarita making kit for the cocktail hour you’re going to host after that final presentation. Or, in our first whitepaper we discussed mobile marketing solutions—you could invest in some sort of trailer or RV you can take on the road to follow up with attendees as part of your post-event marketing.

Imagine setting up follow-up meetings with prospects and showing up to their facility for an in-person, small-group meeting where they come outside and demo your product! Instead of swiping through to spin around your product in 3D, they can literally pick up your product to spin it around to finally get that hands-on experience.

Not to mention, there’s a scalability factor. Your virtual event space is a website, it can be repurposed and reskinned for future events or to allow post-event access and use as a sales tool for quite some time. (Even that mobile marketing solution can be repurposed—you could even drive that RV right into a trade show floor when events do come back!)

The point is, virtual events do have a cost, but there is still cost savings you can take advantage of to make sure your event is successful, and your business goals met.

Ready to get your own virtual event rolling?

Virtual Events Details: Sales, ROI & Justifying the Virtual Event

Because we can’t gather in person, embracing and understanding virtual events right now is crucial to your sales strategy and business goals. In the end, we’re all attending and planning virtual events to make up for the inability to sell and develop customer relationships in person, right? Let’s figure out what you’re doing about sales in this virtual world, starting with your event website metrics.

Depending on your product line and sales strategy, you’re going to have different key performance indicators, or KPIs, to judge whether the event is a success. So, you want to look at what types of information you can get out of a virtual event, and what makes sense for your goals to prove ROI.

For one, there’s direct sales to consider. Could your product or service be sold through the event, using traditional Ecommerce? Should we build out a limited time run store, specific to this event? Can we actually sell access to this event?

Or, would a series of complex forms help to complete your sales process? And does your event feed into an existing sales portal already created elsewhere? This is, again, a website, so the data it contains can be passed over when necessary.

Obviously, we’re going to want to pull customer data at the end, but we want to know first what statistically is a KPI to you and what’s irrelevant data.

Is there an automated marketing platform synced up to this virtual event that we need to be able to pull and push data from? What from this event needs to feed your Salesforce, Hubspot or whatever CRM tool you use? How much of this data do you want in your CRM? Since there’s so many different things that we can track, we’re really going to need to fine-tune those KPIs.

Information like: How the attendees used the site, the total number of minutes spent in live webinars, live chats, live web calls, and who downloaded what information is pretty much table stakes in our minds. These are just a few of the metrics we can typically get from all live events. Depending on the complexity of your event, there’s other things we can see from the virtual event space. It really depends on what tools you pull in to best meet your audience needs and your company goals. There’s so much information that is available, depending on what you put into your virtual event, that it requires a long discussion when you start building.

We may read like a broken record in this blog series, but you’ve got to spend some time looking at how to measure your goals, and that should help you determine the tools you need to fill your virtual event space.

So, what’s the last piece of the puzzle to planning a successful virtual event? Check out the final blog in this series covering timeline and marketing considerations for virtual event planning, here.

Virtual Events Details: Other Communication Tools

Even though it’s a virtual event, you can still recreate those moments for conversation and networking (even the random ones)! And while everything we’ve discussed in this blog series so far is communication in one way or another, now we’re talking tools that are a little bit more ‘talk show’ and a little less ‘broadcast news.’ ​

Let’s review some quick facts of the communication tools that you should consider besides the webinar route.​

Forms:

  • Great for polling attendees and starting complex sales funnels.
  • Relatively easy to execute.
  • Tried and true.

Simulated Live Chat, AKA Chatbots:

  • Everyone uses them (even though we often find no one likes them…) and for simple, “How do I get the link to work?” type of questions, they have their place.
  • Typically, they also require a lot of quality control examiners to find the appropriate questions that users will experience, so do not expect these to work well for short-term virtual events. However, if you’re looking to have a large attendance, they are almost a requirement before even getting to an actual live chat, to weed out some of the work placed on your operators.​

Live Chat:

  • When you want to talk (sort of), live chat is great as multiple operators can handle several chats at a time and can provide the back-and-forth necessary to keep the conversation ball rolling.
  • Of course, you need staffing for those operators, and the operators must be familiar both with the technical aspects of your products and services as well as the actual virtual event, as some of the questions they will be fielding will always be about the tech of the virtual event space.​

Click-to-Call (i.e. Skype):

  • Getting an operator on the phone who can see the attendee’s screen and answer questions requires manpower.
  • However, if you’ve got the staff, it can provide a great person-to-person experience like that of a physical event one-on-one.
  • Depending on what your current communications tech stack looks like, there’s some excellent ways we’ve been able to implement these into virtual events.

When it comes to recreating random conversations, there are tools for that, too.

At a physical event, sometimes the best conversations and networking opportunities come from those random hallway excursions, or by sitting at a table full of strangers for lunch.

Our favorite tool for emulating this in-person experience is the Instant Meeting. Because there’s nothing like those accidental networking incidents that happen at lunch in a physical event, where you end up talking to someone you’ve never met at your lunch table; we want to do everything we can to keep some of this person-to-person connection during the virtual event.​

Lately, we’ve been referring to this as the ‘lunch room chat’—for pretty obvious reasons. No more than eight people can join, but you can have as many of these live lunch room chats set up as you want. ​We’ve had prospects want to actually pass these out to exhibitors when they’re planning an entire exhibit event and not just a show for themselves.

Simply allowing your virtual attendees to randomly chat amongst themselves is pretty cool, if we do say so ourselves. ​(And all you have to do is click a link, there’s no extra sign-up!) There’s also no moderator here, so the conversation flows just as it would in the hallway or lunch room. You don’t even need to give them a topic like dear Linda does (for those of you who understand this pop culture reference):

Now that you’ve gotten an overview of virtual events and how to determine your three base needs, as well as detailed dives into the event website, content types, and communication tool uses, you’re likely wondering how you’re going to justify hosting a virtual event to upper management and key stakeholders.

We’ve got you covered—check out the next blog in this series on sales and ROI measures to ensure your virtual event meets your goals, here.

Virtual Events Details: Using the Communication Tools

More than just an introduction to virtual events, including an overview of objectives, audience, and technology considerations, our blog series on this timely topic has so far covered details on the virtual event location (hint: a website!) and how best to frame your event content. So, what happens next in the process for planning your virtual event? Figuring out how to put the right communication tools to work, to share your content.

You’ll likely have several goals specific to your virtual event. However, there’s one main goal for all virtual events that should be included in your list of objectives: The goal of driving interaction at your virtual event by using the appropriate communication tools.

Take webinars as an example. We’ve all been to numerous webinars by now​. But, did you know the webinar tool can be used for something other than an educational-based broadcast?

Webinars: Best-Use Practices

  • Long format = Breakout sessions
  • Short format = Demonstrations
  • The ‘Almighty Registration Page’

A webinar is a tool. As is a drill. With a drill, you can put holes in things. You can also use it to place screws. We’ve seen videos on YouTube where people peel buckets full of potatoes in 30 seconds flat. Or, hey, stick a corn cob on the end, and you can become TikTok famous by eating corn on the cob. (Really, it’s a thing, look it up later.​)

The point is, webinars can be used for your standard long-form session, but they can also be used for short, five- to 10-minute mini-meetings. You can schedule a lot of them, and if you have a good sign-in process (one like ours that doesn’t require you to sign in to each one individually), you can start to break up the day, similar to how you do with trade show scheduling apps on your mobile device. In short: Don’t look at any one tool, and think it only has one use.

We’ve talked with clients about building out a whole day event, where there were different, small-group webinar live demonstrations happening every five minutes, and with larger breakout sessions scheduled every 45 minutes. The registration form built out the attendee’s itinerary and allowed for some structure for their event day. And when the person wasn’t in either a breakout session or a live demonstration, they were able to do some self-exploration through the available free flow content (both passive and active). ​

Rethinking your use of the various communication tools can also help you to repurpose existing content. Especially if you’ve been planning a physical event that was postponed or canceled, you’ve likely already created some content. Thinking about a typical trade show booth, and what’s presented there, often there are wall-mounted TV monitors playing video loops. There’s also pamphlets and flyers and business portfolio handouts. Not to mention, some cool swag that’s been designed, if it’s an industry that allows for that, or a planned activity to engage visitors like jeopardy or a photo booth.

Repurpose Existing Content, like:

  • Video​
  • PDFs​
  • Planned activities​
  • Content from your ‘archives’

Ask yourself of these pieces of content: Is any of it still usable? And more importantly, looking at how it was used before, is it still useful? Just because it exists doesn’t mean its usability or usefulness in this new event setting hasn’t changed.

Let’s look at a video that was used in a loop as a background video at the show, for example. This video may have been created to bring people in from the aisle, but to actually sit and watch it for a long time may not present the information the best way. And that flyer was information you wanted the attendee to leave with, it wasn’t the main piece of content that you hoped to draw them into the booth to get. So, let’s make sure that your content is repurposed intelligently.

Perhaps that video becomes the background to your website to add layers of visual appeal. Or, it’s turned into a ‘choose your own adventure’ style presentation with pauses for multiple choice questions that the viewer can answer, and which would play a different video for a custom-tailored experience. You could leave the flyer as a downloadable PDF or turn it into a set of infographics to encourage social sharing of the information. And you could still recreate those in-person activities, by developing a web-version of your jeopardy game complete with public facing leaderboard to allow for competition between visitors or adding greenscreen-less camera tech that allows users to pick their custom background and snap a shot to post somewhere in your event site space.​

Just because your physical event canceled doesn’t mean you have to throw out the baby with the bath water. Figure out what’s still useful, or if tweaking it would make it useful. Just be sure you’re not pushing content to the forefront if it’s not going to help you achieve your, or your audiences’, goals and objectives.​

Check out the next blog in this series detailing more communication tools that you should consider for your virtual event, to drive interaction, here.

Virtual Events Details: Framing the Content

In order to develop and design the structure of your virtual event website, you need to first figure out your content and how to frame it. Going back to the flipped golden rule we mentioned in the second blog of this series, how your audience prefers to consume their content will help you determine the ‘container’ you need to build.

Because there’s lots of different ways to slice and dice the term, ‘content,’ we’re first going to share some agreed upon language for types of content.

One of the ways we can do that is to separate the content types into a few different categories. Now, there are a myriad of ways I’ve seen of content broken into categories, but we’re going to use the one that we like best. (If you’ve been through some other webinars on virtual events, you may see different ways of defining content, or see the definitions that I’m about to throw out used differently. That’s fine; each of us content strategists use a variation and personalize our terminology.)

For virtual events, we define content as passive versus active, and scheduled versus free flow. Looking at how these vary, often we want to keep things straightforward and black-and-white, putting content into one of two buckets…but it doesn’t really work like that. Content often fits in more than one bucket, and so it’s more important to think of variations like digital tags. All content can be tagged with more than one tag.

For example, look at a live webinar. It isn’t timeless—it only happens at a scheduled time. If you’re not there, it isn’t a live webinar. However, webinars in a lot of ways are extremely passive. As a presenter, we can look at the analytics of a webinar we’re livestreaming and see what percentage of the audience have a different screen loaded up and are working on something else at the same time as watching the webinar. These people are listening, we assume, but they’re working on something else. But a webinar can also be active. When polls are launched or the presenter asks for hand raises, the audience is being involved, and are actively clicking on things. Questions are sent in as they’ve come to mind, and some attendees have been actively engaged the entire time, ignoring emails, texts, instant messages, kids walking in to home offices, and so on.

A PDF or a video file can be passive content. Conversely, a 3D product demonstration or a 360-degree video tour tool, although completely free flow in feel, can require heavy engagement, so we’d consider it active. However, a live-hosted, hands-on product demo from a sales person in a small chat room needs to be scheduled and is also active.

Isn’t content fun?

Here’s just the beginnings of a ‘list’ of content types:

  • Video
  • Webinars
  • Chat rooms
  • PDF downloads
  • Text
  • Slideshows
  • Virtual tours
  • Walkthroughs
  • Augmented reality
  • One-on-one calls
  • Image slideshows
  • Virtual Products
  • Audio/podcasts
  • Interactive games
  • Virtual lunch
  • Keynote presentations
  • Forms
  • Polls
  • Note panels
  • Image galleries
  • Offline tie-ins
  • 3D Tours
  • Virtual product presentations
  • Electronic sales
  • Gated content
  • Simulated webinars

As you can see, there’s a lot here, and depending on your initial goals and objectives, as well as the content that you have already, some of these may be appropriate, where others won’t be.

The sky is the limit. In fact, determining virtual event content feels like a daunting task for many; it’s easy to get overwhelmed with all of the different possibilities. That’s why you need to start with your objectives, and the content you already have in your marketing communications archive, before starting to plan on how to frame your content into the website. Working from the containers first is an almost impossible task—the containers are limitless! That’s why this section is just called, “Framing the Content.” Remember, content is king; the frames are not.

Something important to note: We all want something cool and flashy, our brand’s ‘it’ factor needs to come through and be felt through the screen, and we don’t want to present something without a big ‘WOW’ factor. However, at the end of the day, the content’s value comes from what that audience can take away. So maybe the cool 3D-rendered spinning booth is exactly what you need. But, maybe the streamlined linear website with only one main graphic is a better container for your content.

If you take away one thing from this entire blog series, remember this: A virtual event is thrown by you for your customers. Not for you.

Check out the best-practices insight we’re sharing on how to utilize certain communication tools for your virtual event—outside their typical use, here.

Virtual Events Details: The Event Website

As we mentioned in blogs one and two of this series, virtual events share similarities with live events.

When it comes to virtual events, the website is really like the event location. Inside the event, different things are happening, from seminars to breakout sessions and live demonstrations. There may be some self-exploration of content, like wandering around the trade show floor. Perhaps there’s some virtual rooms that allow you to chat with random attendees.

All these aspects of the event require different tools, programs, and applications. The same way that a physical event may have several rooms, with completely different technical needs, your virtual event needs to be able to include a slew of different tools. The only way to get all the different applications into a cohesive environment is to house them within a website.

Why? A comprehensive website that houses all of the different tools allows you to control all of the different components of your event from one place. Imagine if a puppet had four different people pulling on each of the strings. How hard would it be to make it dance? A website gives you control over every technical aspect that the different software tools bring to the table.

However, this cannot be your regular website. We can’t mention this enough. Your website is going to have information on everything you do. Therefore, sending this targeted, specialized audience to your full website is a great way for your audience to get lost. Instead, this is a precise, targeted, narrowly focused website. (A ‘microsite,’ if you will.)

For those of you who’ve had a show organization invite you to ‘present’ in their ‘virtual show’ by providing you a page to upload your sales material…be warned. We’re sure some of you reading this have already had events that have been canceled that have been provided with these ‘virtual event’ pages that are simply a place for you to dump literature by way of PDFs, add a single video and some text, and a graphic of your logo with a link to your website.

Working with those event spaces is not a bad thing. The caveat is that there’s very little analytics that you’re going to be able to pull out. What we recommend is creating your own virtual event to drive traffic from the show virtual event space to your own, and which is something more than just one individual page. It makes more sense to send people from these virtual show halls to your own virtual event space, so that you can create a more immersive and interactive environment and get those deeper analytics. Moreover, by creating your own virtual event, you can leverage the traffic being driven by the show event space as well as drive additional outside traffic to it (by marketing it!)

Where things start to deviate in the similarities between virtual and physical events is in the varying event logistics. Moreover, a lot of new considerations and questions that come up when trying to plan out a virtual event occur because there’s a lot less limitations—because there’s no size limitations and there doesn’t have to be any time limitation, there’s some extra logistics that you’ve never had to think about when planning a physical event or exhibit.

Functionality logistics to consider for your virtual event website:

  • Will this event be available to anyone or accessible only via login?
  • Is this site going to change throughout a specific period of time:
    • Are you running this for the length of the event, and then it is gone?
    • Is it going to start with everything, and then have some of the content go away, leaving a shell of what the site was during the event?
  • Will this event site be a one-time use or reused with content updates?
  • How large a roster will you need for personnel and staffing?

If you’re planning on having live demonstrations or fully livestreamed webinars, there’s going to be specific times that these occur. You then have to decide if the virtual event is only ‘open’ during those live times or if you’re going to want to keep this event space running after the fact and, if so, swap out those live demos for some video content or simulated (pre-recorded) webinars.

There’s also one major logistics question we haven’t seen anyone address: Who are your event personnel and what’s your roster count? You’ll need operators for live chat, sales people ready for phone calls and video conferences; remember, only the venue should be perceived as virtual. That means we’re trying to make it as real as possible—which means you need real people at the other end of those communication tools to drive real conversations, not just chat bots who can only take the conversation so far.

And don’t forget, since your virtual event space is a website, it has to ‘live’ somewhere. Is it going to be hosted on your current web servers, or should this live elsewhere? Who’s in charge of the building, security, and maintenance of this website? And finally, when you’re looking at the tools you’re going to plug into this website, who’s taking ownership of that process? There’s a lot of things to consider, and some of it can’t be fully decided until you know what you’re going to include in your event.

But, if we’re going to talk about structure, and what’s going in to the website, we’d better figure out content.

Check out the insight we’re sharing on how to frame your content for a successful virtual event, here.

Virtual Events: Determining Your Objectives, Audience & Technology

In our first blog in this series, we gave an introduction on virtual events. As we continue our overview, we’re next sharing insight on steps for planning your virtual event, and that starts with understanding your content.

Think about what you plan to present: Are you debuting a new product? Showcasing newly added features to an existing product? Do you just want to remind your customers how awesome your product is, to get them to buy more?

This is your main content for your event. You need to decide first what is being presented. You need to decide what the key takeaways are going to be for your audience. And then you take some planning and ideation steps like you would a physical event before you can pick and choose those platforms.

You need to review your event objectives and needs, so you know what action this content will drive, identify your audience, so you know how this content will be presented, and then determine those base technology needs, so you know how this content needs to be experienced.

Reviewing Your Event Objectives and Needs

What do you need your content to do? For instance: Is the primary goal to gain new business, or reinforce existing customer relationships? How will you track ROI? Are you demonstrating a product or piece of technology? And how long will a typical meeting/presentation last?

If you’re objective is to gain new business, at least some of your content should speak to your brand story, to increase that awareness. When it comes to tracking and ROI, what kind of metrics matter to your goals? For Company CoolCat launching those three new products, they’ll want to know not only who looked at their virtual event, but also how long each visitor spent looking at and learning about each product. And things like product demonstration or speaker presentations—is your objective simply to share information, or are you looking to drive interaction? Will you have one long presentation for everyone to attend, or is it your goal to allow the audience to pick and choose shorter sessions to attend and interact with what is most important to them?

Identifying Your Audience

Next, define your audience; not only for the obvious benefit of planning your pre-event marketing efforts, but to further figure out how your content will be presented.

Considerations for identifying your audience include:
• Prospects vs. customers
• Locked door vs. ungated content
• Familiarity with your company
• Requirements to attend/participate
• Building distinct customer journeys
• Location & time zones

From the list above: Do you have a specific audience that requires registration and a login process to keep things private? Or, is this open to pretty much anyone who has internet access? Does your audience have the time to peruse your virtual event at their leisure or is this a quarterly board meeting that has definitive start and end times? Of course, things like availability of internet access and time zone will affect how you share your content, too.

The last thing we want to impart on the importance of defining your audience in these beginning stages is making sure the content you provide aligns with their preferences.

Remember the golden rule you were taught as a child: Speak to others how you would like to be spoken to? Good. Now, forget it. Because when it comes to marketing, you need to speak to your customers and prospects how they want to be spoken to; which means you also need to determine what their content preferences are first, and then communicate your information through those preferences. If your audience prefers visuals, make sure your content is stacked with infographics, slide shows, and videos. (And leave that 10-page whitepaper behind.)

Identify Your Event Technology Needs

So, you’ve figured out what you want your content to be, what you want it to do, and how best to present the content based on your audience.

Now, you need to think about the technology needed to power your experiences:

  • Bandwidth capabilities
  • Webinar portals
  • Live chat (1:1 & small group)
  • Video content
  • Downloadable takeaways
  • Games, entertainment & interactive content
  • Social media
  • Ecommerce
  • Swag

Audience size will help you determine how much bandwidth you need. Keynote speakers and presentations means needing webinar or embedded video tech. Recreating those ‘happenstance’ breakout session conversations and networking opportunities means live chat or video conferencing tech. There’s tech to build various interactive games, different tech needed to livestream your social media, Ecommerce tech that can be tied in for direct purchases, forms for submitting mailing addresses to send out swag; the list goes on.

Notice how we haven’t once mentioned a specific platform at this point. That’s because technology needs can be handled by a myriad of platforms, and we’re platform agnostic. We don’t have one platform partner we use or recommend over another because we can work with them all! And that’s because—going back to our carpenter lumber metaphor—we don’t force-fit your content into one platform. We find out what you need first and custom-build a virtual environment with the platforms that provide the technology you require.

We can’t reiterate this enough: Content is still king here. Don’t worry about the platform just yet. First, focus on your main content—what you want to present. Figure out and pull together a list of what you want your attendees to experience while keeping in mind your objectives, audience preferences and technology needs (and it’s okay if you don’t have everything figured out, as we can help you where you’re stuck or unsure).

Once those details are outlined, that’s when we start building the website that houses the platforms and delivers your content in a way that recreates those moments of connection and excitement to make your virtual event a success.

In the following articles to this blog series, we’re going to dive into some details for how to develop, build and design your virtual event space with the right type of communication tools and platforms.

Check out the insight we’re sharing on the functionality and logistics around the virtual event website, here.

Virtual Events: An Introduction

It’s certainly been fascinating from the marketer’s point of view to watch us all pioneer this new avenue of connecting with customers while we wait to be able to visit businesses and gather in large groups again. But we’re also noticing that there’s been a lot of confusion and uncertainty around virtual events, which is why we wanted to share this blog series.

Maybe it’s because ‘virtual’ has become this sparkly, Holy-Grail-of-ideas buzzword. Everyone is talking about it, you’ve probably been brainstorming with your team as to ‘how to get one’ (we certainly hope that’s why you’re reading this article!), and yet, there’s a lot of uncertainty around how to actually put on a virtual event, because—like the holy grail—it seems more fairy tale than reality. And that’s likely because it’s a new experience for us all. ​

New things are scary, being the first to do anything is scary. Whoever decided to try eating a lobster for the first time…well, hat’s off to that guy for sure, because that looks like a scary animal to eat. But who knew it was going to be so delicious?!

But joking aside, even though virtual events seem new and daunting, they have actually been around for quite a while. Watching a webinar (which we’ve all been doing lately) means you’re attending a virtual event. And when you’re FaceTiming or Skyping with friends or family, that’s a virtual event, too. What’s new is that now we’re trying to recreate those personal moments of connection on a much larger scale, hoping to talk and learn from hundreds of people—even thousands of people—all from a space that doesn’t actually exist.​

But, enough about philosophy. Let’s start with something concrete: why we exhibit in the first place.​

We’re digital experts, but we’re also the first to tell you that people matter. It’s extremely important for us to get this point across: A virtual event’s primary objective is to bring people together, the same way a physical event does. ​

The ability to network and meet new people matters. How else are you going to get new customers, build loyalty and increase sales? And there’s nothing more powerful than doing so in a face-to-face setting. But, if we’re sure of one thing, it’s that virtual events are here to stay. And as we pivot our own strategies to embrace virtual experiences, we want to help you do the same. Because you can emulate those opportunities for communication and connection that are found in the heart of face-to-face events. And you can create an engaging and memorable experience online, just as you would on the show floor. ​

Because we can’t gather in person, embracing and understanding virtual events right now is crucial to your sales strategy and business goals. It’s not just about hosting one webinar. And while virtual events live on a website, it’s not your typical website (you already have that anyway). A static website or a passively-engaging webinar is not going to give you that personal connection found on the show floor. Recreating those moments for connection comes from building a website that has multiple touchpoints, multiple pieces of technology platforms, that allow for different interactions with your audience.

But before we get into those details, let’s first look at what goes into building a physical event.

We say this because planning a virtual event starts off pretty much the same way. We had registrants to our webinar submit responses to some survey questions when they registered. One of them was a true/false claim about whether planning a virtual event is similar to a physical one. What was interesting is that more than half of our registrants answered ‘false,’ that they weren’t the same, or that they were unsure. And we’re glad that was the consensus, because it means there’s going to be a lot to learn here. Because they really do start off the same!

Nothing listed below is going to be a revelation to trade show event personnel, so we’ll just talk to an example—Company CoolCat is planning to attend a trade show to demonstrate three new products that they are launching. ​

For this company to have a successful exhibition, they need:​

  • Something eye-catching to bring people from the aisle into their booth
  • Something for lead retrieval to record visitors who have engaged with the exhibit
  • A few monitors running with looping informational videos, as well to generate brand awareness and recognition​
  • FABulous display of the features, advantages, and benefits of these three specific products​
  • Three different display areas that allow for hands-on demonstrations for each product​
  • A private meeting room for those one-on-one deeper sales conversations with interested companies
  • ​An engaging in-booth activity and some handy swag that’s passed to attendees, so they remember CoolCat
  • A solid post-show marketing campaign would be needed to follow up with attendees

Sound about right? ​

This same process is no different for planning the virtual event. Think back to the last time you bought a car. Did you tell the salesperson, “You pick me a car and you sell me that.” No, we’re going to hazard a guess that you had a list of criteria for your car. You wanted AWD, a moonroof and heated steering, and you brought that list to your sales guy and asked him to find the comparable vehicle. Said another way, a carpenter isn’t first going to buy a compact car and then think, “Now…where do I put the lumber in it this thing?”

Because of the current circumstances, we understand strategies are pivoting and moves are being made on the fly. However, the exact (backwards!) strategy seems to be how many companies are approaching virtual events. People are rushing to buy platforms full-tilt, without first determining what they need their virtual environment to do.​

Think of it like this: The website—your virtual environment—is your booth space. But instead of a 10×20’ footprint, the size is pretty much limitless. ​And you can design this website however you want, just like a physical booth. We had a conversation with someone who was looking to create spaces for their 25 vendors to share information, which means to start we already know they will need a website with a homepage plus 25 sub-pages.​

But you can’t design anything unless you know what’s going to go in it. Just like you know what you’re planning to present in the physical exhibit space, creating your virtual space starts with knowing what information you’re sharing. ​

In the following articles to this blog series, we’re going to provide an overview for considerations in planning your virtual event, as well as dive into some details for how to develop, build and design your virtual event space with the right type of communication tools and platforms.

Check out our overview of Determining Your Objectives, Audience & Technology Needs, here.

And, bee sure to get our comprehensive guide to planning your virtual event by downloading your free copy of our whitepaper: You’ve Decided to Host a Virtual Event…Now What?

Face-to-Face Strategies You Can Start Now for the Return of Business – Part 4

Part 4: Strategies for Mobile Engagements

There’s always something new and exciting happening with our clients, and the exhibit world in general. While we’re certainly dealing with a lot of unforeseen events these days, this is really just another opportunity to try new things; maybe go out on a limb a lot further than you would have, even two months ago. The ideas here will provide you with some action items to work on now, so you can hit the ground running when the time is right.

Solution 4: Mobile Engagements

If your client can’t get to you or your show, then take the show to them! ​With mobile engagements, it’s basically like designing your own booth…and then just putting some wheels on it.

You can create plans to maximize ease of travel and set up meetings that are hours or even days apart. Your reps can book a location that caters to just a few people from one company or expand it to handle several different groups who are booked at different times, to come to a common, central location. And while the logistics, operation, and management of the vehicle, and the driver and supporting cast needs can look daunting, they can be handled easily as a turnkey package. So, managing all of these aspects does not need to be your problem if you’re unsure of how to handle it. (That’s where we come in!)

When you think of a mobile engagement, the first thing that probably pops into your mind is a large 18-wheeler. Custom trailers can be large trucks, but you can get similar functionality in smaller trailers that can be pulled with a pickup truck. You can even use the ‘booth in the box’ concept and transport them in smaller branded vehicles.​

Below is an example of a medium-sized trailer. This was built to replace some of the brand’s smaller trade show events they had planned to attend. They wanted to bring a wide selection of their fluid pumps directly to their clients, and so they built a recreation of a laboratory so that they could demonstrate fully functional products in a familiar and fully branded environment.​


(Note: The visuals presented here are all things that BlueHive as a company have produced.)

This mobile engagement included a built-in generator and a sound system, and the side of the trailer folded down to reveal additional workspace and seating.​ The sales rep drove the truck himself up and down the West Coast for a set amount of time. (You can certainly do that or, for larger mobiles vehicles, you would hire professional drivers.​)

There is no limit to how you design the exterior and interior of the vehicle. Everything is built-in and prewired, so you can bring complex demos right to your client’s doorstep or show off new software applications or solutions all while maintaining a safe and secure environment. Additionally, a mobile engagement is designed for ease of setup. Depending on scale, you can be up and running in as little as 30 minutes. You can even have your own built-in heating or air conditioning as well air filtration. And because you have access to the entire environment, you can control cleaning and sanitation.​

You can build this thing from the ground up; you can go all in and create a vehicle and build it 100%. But what we’re finding is that there are a lot of vehicles that when they are retired from the brand that used them, they are resold or rented back out. So, a lot of times we can retrofit vehicles to get this same program up and running with a significantly lower cost.

And then, ultimately, there’s added value as they can become brand ambassadors that offer information or hospitality as you continue to (literally) drive brand awareness and get your name out there.​

To the point of scalability: Clients have built their exhibit program around one of these vehicles. You can literally drive (or roll) the trailer into your booth space. You get all of its functionality as well as a commanding booth presence. If there is any space left, you can use it for seating or hospitality, as shown below.


​(Note: The visuals presented here are all things that BlueHive as a company have produced.)

And, rest assured there is a different drayage rate that is applied to vehicles for the trade show floor. The truck driver essentially drives it in, drops the trailer and drives away!

Conclusion

We’re all tired of feeling like we’re stuck in this hurry-up-and-wait game. These ideas offer several ways to get busy now with the leg work to implement a strategy as soon as you are allowed, helping you further increase exposure and drive sales through these events.​ In the exhibit world, after all, you don’t need to know your final booth space or hanging sign regulations before you begin the design process. ​So, the idea here is to get the ball rolling now and work towards whatever challenges as they come up. When the information is available, you tailor the design to that need.

As groups are allowed to congregate, we should see some live events take place and speed up a return to normalcy. And in the meantime, why not start smaller with your own mobile engagement and grow from there? No investment is wasted; nothing that you do now is wasted. Everything you do now can be used on any scale, later. So, let’s get out there and start brainstorming!